There are quite a few essential components that make a bike work as intended, not the least of which is the chain. In fact, it’s kind of impressive how much this series of small metal links actually does to keep you moving. But most of us don’t fully appreciate those efforts until our chain breaks. So how can this happen?
A bike chain can break or get damaged in one of four main ways (listed from most to least common): when it’s under too much tension; it gets bent or twisted; it’s worn and stretched out; or it takes a direct impact. Numerous factors can cause each of these occurrences.
Let’s dive deeper into these four ways your chain could malfunction, how you can prevent them from happening, and, if you’re unlucky enough to run into one of these issues, how you can fix your chain on the trail to get you moving again!
4 Ways Chains Can Break / Get Damaged
1. Chain Under Too Much Tension
The most common way your chain will get damaged is if it’s being put under too much tension. Chain tension is essential for proper shifting: too little and the chain will fall off the cassette, but too much can cause it to snap.
A chain can be put under enough tension to cause a break if you pedal too hard while shifting. The general rule of thumb is to ease up on the pedals during a shift so your chain can jump smoothly to the next gear. If you apply too much force at this time, the chain will struggle to shift gears and can get damaged by the cogs as it attempts to move up or down.
How do you know if you’re pedaling properly when shifting? Listen for clues. Shifting should be relatively silent. If you hear a loud clunking noise as you shift, it means you’re applying too much force to the pedals while the chain is trying to change gears.
Improper chain tension can also occur when installing a brand new chain. Most chains will be too long to install on your bike without removing a few links first. This is done on purpose, so they can accommodate a wide variety of bikes and drivetrains (better to have too many links than too few!)
But if you remove too many links, your chain will be placed under too much strain when you shift to the largest (easiest) gears on your cassette. This is why when installing a new chain, you want to place it on the largest cog in the cassette to measure and remove the right number of links. That way you can be sure it will be properly tensioned in every gear.
2. Chain Gets Bent or Twisted
A chain doesn’t have to break completely to be unusable. Sometimes a single bent or twisted link can be enough to throw your shifting out of whack and make for a very unpleasant riding experience.
How does a chain link get bent? Most likely it will occur when your chain falls off the cassette. If it jumps off the largest cog and gets wedged between the cassette and the spokes of the wheel, it can get itself stuck pretty good. The issue usually arises when you try to remove it. It takes a lot of effort, and if you’re not careful you can bend the chain during the process.
Another place you might find your chain getting stuck is in the rear derailleur’s guide wheels. Imprecise shifting or any maintenance where you need to remove the rear wheel could lead to your chain coming off the guide wheels and getting jammed in the derailleur. Again, not a big deal…until you get too aggressive trying to remove it and bend one or more of the links!
3. Chain is Worn Out
Chain stretch. Yep, it’s a real thing.
Even though they’re made of metal, over time your chain will grow longer as it wears out. It’s not the links themselves that stretch however, but the pivots and roller bearings that connect the individual links. These are the weak points, and as you rack up the miles the bearings will begin to bend under tension.
The amount each bearing stretches may be miniscule, but seeing as most chains contain more than 100 links, these small differences add up. As they stretch, the structural integrity of these bearings decreases, which could cause them to fall apart and the chain links to separate.
If you’ve had the same chain for a while, it’s a good idea to check for chain stretch. You can buy inexpensive chain checker tools (like this one) which will tell you if your chain is due for a replacement. Your chain might look perfectly fine, but if it’s wearing out, it’s going to impact your shifting performance. And if it breaks, it could lead to a crash.
4. Direct Impact to Chain
While the least common of all the methods of chain destruction, a direct, hard hit to the chain could cause some damage. If you smash your derailleur into a rock, on the edge of a skinny, or just on the ground during a nasty crash, the chain could get bent out of shape or break upon impact.
If this happens, it may not just be the chain that’s affected. In addition to fixing or repairing your chain, you should inspect the rest of the bike to check for other damage before riding again.
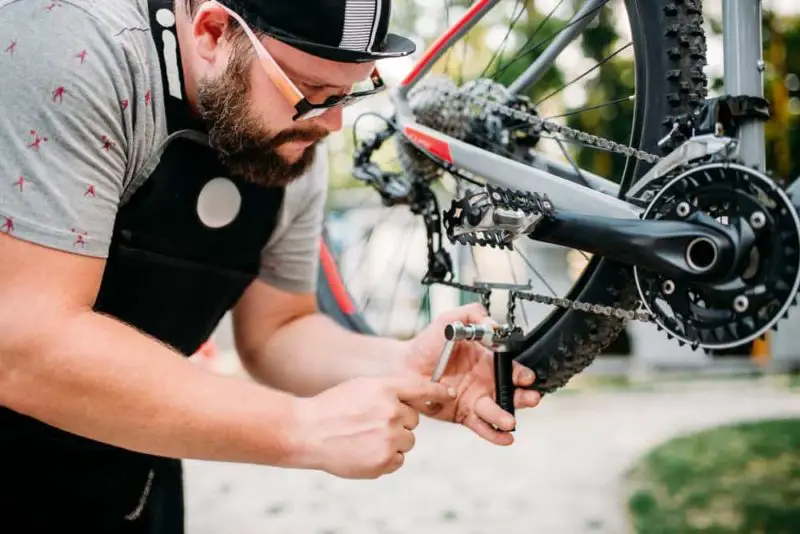
Tools Needed to Fix a Broken Bike Chain
Chain Tool
A chain tool is an essential part of your riding kit. Whether your multi-tool has a chain breaker on it or you prefer to carry a separate one for ease of use (I carry the Universal Chain Tool from Topeak), make sure you have one with you on all your rides.
A chain tool will enable you to remove the rivets that hold the chain links together so you can remove and replace damaged or broken individual links.
For a detailed look at how to use a chain tool, check out the video below:
Third Hand Tool
A third hand tool is simply a bent piece of metal that is used to clip both loose ends of the chain together and hold them in place while you reassemble your chain. Some chain tools come with them (like the Universal Chain Tool linked above), but you can always make your own by cutting and bending an old bicycle spoke to fit.
It’s a small tool that’s a huge help when both your hands are occupied trying to operate the chain tool and hold all those tiny pieces in place while you reattach them.
Spare Master Links
The two loose ends of a chain connect at what’s called a master link. This link can be easily opened and closed if you need to remove or replace a chain on your bike. A spare master link makes a great backup chain link if any other links sustain damage and need to be removed.
You can replace any broken link with a master link and be ready to ride again, so you should carry at least one spare in your repair kit for this purpose.
Master links (and chains themselves) are designed specifically for the number of gears your bike has (11 speed vs. 12 speed etc.) so make sure you buy the ones that match your bike’s drivetrain.
How to Fix a Broken Bike Chain on the Trail
If your chain breaks, it’s probably going to be while you’re riding, so you better know how to fix it out on the trail if you don’t want to walk your bike back to the car! As long as you have the tools above, fixing a broken chain is a straight-forward process:
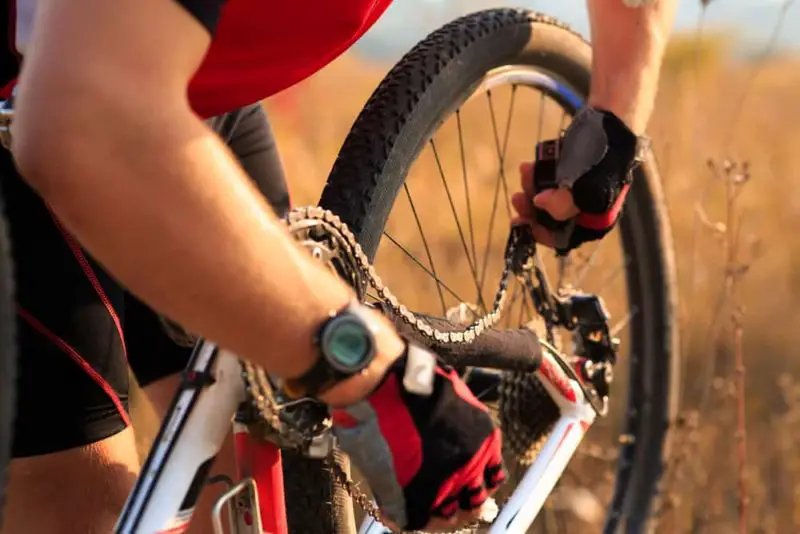
1. Identify the Damaged Link
If your chain has come apart, it will be easy to identify which link is damaged, but make sure to look at the whole chain just in case other links have been affected. If your chain is still in one piece but isn’t operating smoothly, look for bent or twisted links. These are the ones you will need to remove and replace.
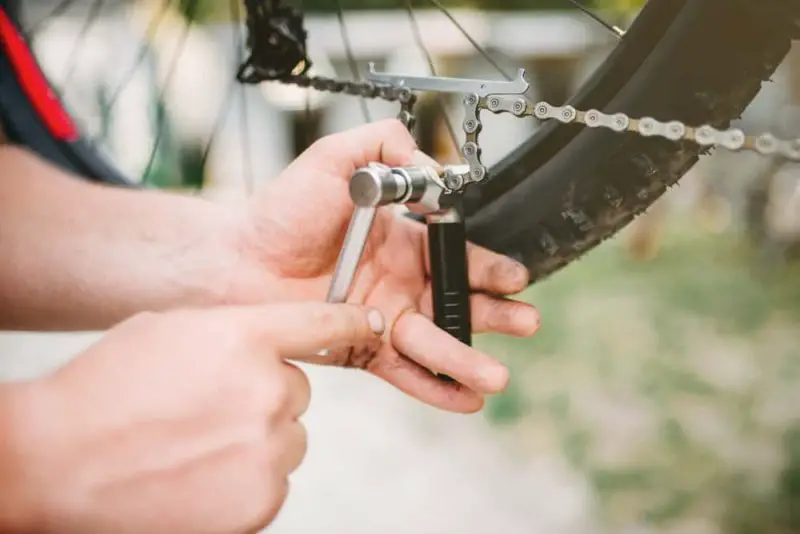
2. Use Chain Tool to Remove Damaged Link
Check both loose ends of the chain and remove the damaged link. If the chain is still in one piece, disengage the clutch on the derailleur to relieve the chain tension to make this process easier. Most derailleurs have a button or switch that performs this function.
Check with the derailleur manufacturer (preferably now and not during your next ride!) to learn how yours operates.
Line your chain tool up with the rivet holding the damaged link onto the chain. Push the rivet out and remove the damaged link.
The next step will depend on whether you have a master link or not, and how many links are damaged:
3a. Replace Damaged Link (with Master Link)
Use the master link to connect the chain. This is where the third hand tool comes in handy (no pun intended). Use the third hand tool to hold the loose ends of the chain in place so you can connect the master link to both ends.
Most master links have directional arrows indicating the direction in which they should move. Make sure you have the master link oriented in the correct direction before attaching!
The last step is to snap the master link closed. Back pedal gently to rotate the chain so the master link is on the upper row of the chain (above the chain stay). Then, hold the rear brake and apply forward pressure on the pedals. This will add enough tension to the chain to snap the master link shut. You’re good to go!
3b. Replace Damaged Link (without Master Link)
If you don’t have a master link, you can still reconnect your chain so you can ride back to the car. You still need to remove the rivet holding in the damaged link, but rather than removing it completely, push it out just far enough to take out the damaged link. You’ll need to use the same rivet to connect the two ends of the chain again.
This repair will get you out of a jam, but it’s not permanent! The rivet you took out will be weaker after being removed and reinserted, so you’ll want to make sure you completely replace it when you get home so it doesn’t become a liability on future rides.
3c. Replace Multiple Damaged Links
If more than one link has been damaged, follow the same steps above to remove the affected links.
Unless you carry more than one master link, removing multiple damaged links causes another issue. As the repaired chain will be significantly shorter, it’s going to impede your ability to use your largest (easiest) gears. The chain simply won’t be long enough to stretch fully around the large cogs.
Your bike will function properly in the smaller gears, but you’ll want to add more links or replace the chain completely when you get home before your next ride to fully restore shifting ability.
One Last Thing to Note
Many of these are temporary fixes. If your chain has sustained a lot of damage and you’ve replaced multiple links over the course of its life, it should be replaced completely to avoid further issues.
Check out this video from Park Tool for a tutorial for each of the scenarios I’ve described above:
How Often Bicycle Chains Break
Chain life will vary greatly based on a number of factors, including how often you ride, how hard you push your equipment, and the weather conditions where you do most of your riding. Considering these factors, your chain could last several riding seasons, or only a few weeks. For instance, pro riders may swap chains after every few races!
Generally, under ideal conditions, you can expect a chain on a road bike to last for 2,000-3,000 miles.
On a mountain bike that life becomes considerably shorter due to the introduction of mud, dirt and other debris into the drivetrain. You’ll want to look at replacing your mountain bike chain before the 1,000 mile mark…assuming you don’t break it before then!
How to Prevent a Bike Chain from Breaking
Sometimes, chain damage is inevitable. You never plan to have a crash or for your chain to jump off the cassette and get horribly tangled and bent. But there are ways you can minimize the chances of your chain breaking due to avoidable causes. Here are four methods for increasing the life of your chain and all the components that make up your drivetrain.
Clean and Lube Chain Post-Ride
Gunk buildup on your chain and in between the links will greatly reduce your chain’s lifespan. You can correct this by cleaning your chain and applying the proper lubricant (“dry” lube for dry riding conditions, “wet” lube for wet conditions) after each ride.
Check out this video for a complete tutorial on properly cleaning and lubing all the parts of your drivetrain:
You’ll be amazed at how much better your bike will perform with a squeaky clean drivetrain.
Reduce Pedaling Force When Shifting Gears
I mentioned this above, but it bears repeating. If you constantly hear a clunking noise when changing gears, you need to ease up on those pedals! Hard pedaling during a shift places a great amount of stress on the chain, which contributes more to chain stretch and reduces your chain’s effective lifespan.
When you hit the shift lever, reduce the force you’re placing on the pedals just a bit until you feel the chain move to the next gear. Sure, this won’t be possible all the time (like if you need an easier gear in the middle of a hard climb) but try to do it as often as you can. It will save you money on replacement parts in the long run!
Properly Adjust Derailleur
We now know a chain could get damaged when falling off the cassette. So if that’s happening a lot, your derailleur could need an adjustment. There are a few important steps in this process, and it takes a little practice, but I’ve got you covered!
Check out THIS ARTICLE to learn how to adjust your derailleur and keep your chain where it’s supposed to be.
Replace Chain Before it Wears Out
The most effective way to prevent your chain from breaking due to normal wear and tear is to replace it before it gets to that point.
If your chain is grimy and looks pretty beat up, it might be time for a replacement. For a more scientific approach, you’ll want to measure for any chain stretch and replace your chain when necessary. Below is a video outlining how to tell when your chain is due to be replaced, along with methods for measuring chain wear:
Bike chains can run anywhere from the low $20’s to more than $70 (if you want a unique color scheme of that fancy “oil slick” look some people like). Depending on how often you replace your chain, this can definitely add up…but it will always be a lot cheaper than replacing a derailleur, cassette and chainring that have been ruined by a damaged chain.
Just something to think about.
Break the Chain…of Broken Chains
Your chain is an important yet frequently overlooked component that’s essential to your bike’s ability to function. Take care of it and you can minimize the chances of it breaking on the trail or damaging even more expensive components on your bike.
If your chain does break (and it probably will at some point), learn the steps above so you’re not left stranded on the side of the trail waiting for help. Equip yourself with the right tools and the right knowledge so you can handle whatever chain issue comes your way…and maybe even help someone else out when they need it!