In order for your bike to do what it’s designed to do, it needs to be able to pedal forward.
Now that I’ve stated the obvious…what do you do when your bike won’t pedal forward? Should you buy a new bike? Are you resigned to only coast downhill from now on?
Of course not! There are many reasons your bike may not pedal forward, and in this article I’m going to identify six of the most common ones, help you determine which one(s) is causing you problems, and offer simple solutions so you can use those pedals for more than just footrests.
1. Chain / Derailleur Stuck or Bound Up
Before worrying about an issue with the bike’s drivetrain, let’s look at the chain itself. If you’re pedaling, hear a loud metallic snap, and then your pedals suddenly seize up, a broken chain is the most likely culprit. This happened to me recently, and while it certainly can be a pain to fix, it rarely causes damage to your bike.
If this happens, the most important thing to do is stop pedaling immediately. If your chain breaks during a ride, further pedaling can cause it to get coiled up between the cassette and your spokes. At this point it becomes very hard to dislodge, and can damage your cassette, rim or derailleur if you’re not careful.
A chain typically separates at the master link: the chainlink where one end of the chain connects to the other, forming a loop. If this happens and the master link is undamaged, you can use pliers to snap the master link back together. If the master link is damaged, use a chain tool to remove the broken link and replace it with a spare master link.
If your chain breaks at any other link, use your chain tool to remove the affected link and replace it with a spare master link. Master links are great to keep in your repair kit because they can be used to replace any broken link in a pinch! If multiple links are broken or your chain looks seriously bent out of shape, it’s time to replace it completely.
Check out this video for multiple ways to repair your chain, depending on where the break occurs:
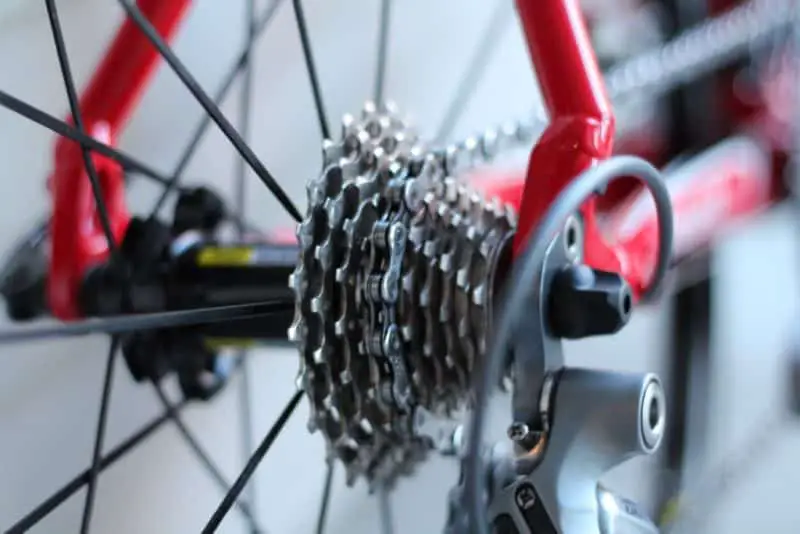
2. Chain Fell Off the Cassette / Chainring
A more common (and less catastrophic) occurrence that will prevent forward momentum is when your chain simply drops off either the rear cassette or the front chainring. It’s easy to tell when this happens: your pedals will suddenly spin freely with absolutely no resistance.
Depending on how hard you’re pedaling, this could definitely cause you to lose control of your bike. Fortunately, it’s a much easier repair than a broken chain. You simply need to set the chain back on the teeth of your cassette or chainring.
To ensure you set it on the correct gear, I recommend first shifting to and then replacing the chain on the smallest cog: that way you know you’ve placed the chain on the gear your bike is in to prevent it jumping to a different cog as soon as you start pedaling…which could cause it to fall off all over again.
While a dropped chain is likely a singular occurrence, it could also be possible that your derailleur is not adjusted properly. If this is the case, your chain will tend to drop frequently.
To get your derailleur dialed, check out my previous article, Bike Won’t Shift Into Lowest / Highest Gear (And How To Fix It). You’ll learn how the derailleur works and how to adjust its high and low limits to keep the chain in its proper operating range.
3. Pedal / Crank Stuck or Severely Rusted
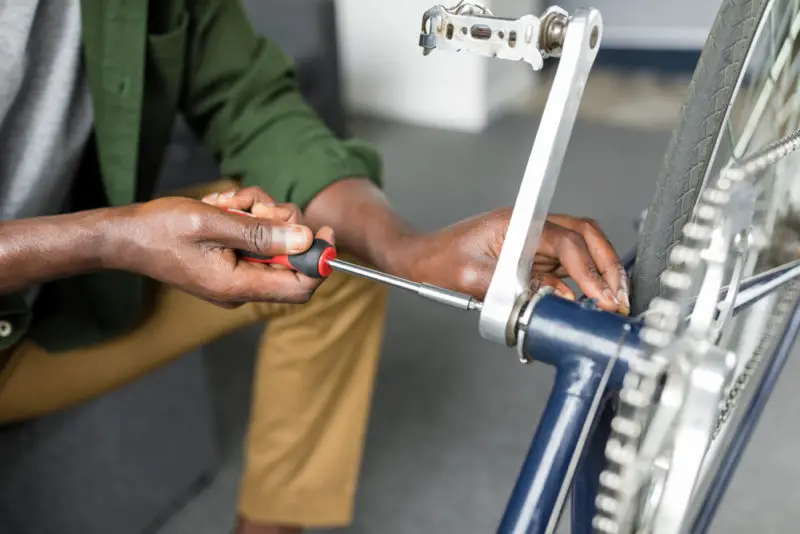
If the chain is still in one piece and where it belongs, but the pedals aren’t turning, there could be an issue at the crank arms.
To see if this is the case, remove the chain from the front chainring and rear cassette and spin the crankset arms. If they don’t spin freely, this is where the issue lies.
For more information read this article: What is a crankset?
On an older or poorly maintained bike, it’s possible the crank arms are rusted or corroded enough that they won’t move. In this instance, you’ll need to completely replace the cranks; but also check the bottom bracket and every other component of the drivetrain for rust or damage. It might be time for a new bike if the damage is bad enough.
But who doesn’t love New Bike Day?!
If rust doesn’t appear to be the issue, the bottom bracket bearings may just need grease or a good cleaning. While the bottom bracket should be sealed, water and dirt always manage to find a way to infiltrate this area. It’s definitely worth taking apart and cleaning if your cranks aren’t spinning as smoothly as they used to.
Maintenance of the bottom bracket requires special tools, so you can always take it to a bike shop and have it handled by a professional. If you have the tools and love a DIY project, follow along with the video below, which will walk you through the steps to removing, cleaning and replacing your bottom bracket:
4. Brakes Rubbing or Stuck Closed
Brake rub won’t completely prevent you from being able to pedal…but it sure will make it a lot harder! If your brake pads are too close to the rotor, the contact between these two components will create excess drag and slow you down.
It’s easy to tell if this is the problem. First, there will be a telltale auditory cue: get off your bike and spin your wheels. If you heat a metallic scraping sound, that’s the brake pad rubbing against the rotor. You’ll also notice your wheel won’t spin freely. Depending on how close your brake pads are, the wheel may not spin very much at all.
Brake rub is caused by your brake calipers pushing in on the brake pads (a normal part of braking) but then not releasing.
Most commonly this occurs when you are transporting or conducting maintenance on your bike. If you remove a wheel and squeeze the brake lever, the calipers will close in on each other. Without the brake rotor in between, they will push the brake pads too close together, causing brake rub when the wheel is replaced.
There are a few ways to fix this depending on how severe the issue is and what type of brakes you have. For a complete guide to correcting this annoying problem, check out my article Why Won’t My Bicycle Brakes Release? You’ll find tips and video guides to help you diagnose the issue and then take care of it to get your wheels rolling free again.
5. Front Wheel of Bike is Locked
What if your front wheel isn’t spinning freely and the issue isn’t the brake?
If you’ve recently replaced your front tire, it could simply be a clearance issue. All bike forks have a maximum tire width they will allow. Go wider than the max, and the tire will rub against the fork legs, causing drag similar to brake rub. If your bike has a front fender, your tire may be rubbing against this as well.
Spin your front wheel and look to see if the tire contacts either the fender or the fork. If it does, you’ll need to choose a narrower front tire. Consult your fork manufacturer’s guide to determine how wide a tire the fork is meant to accept.
If your tire has plenty of clearance, it could be an internal issue. Inside your wheel hubs lie cartridge bearings. If these bearings wear out, they could prevent your wheels from spinning freely. Again, water and dirt find their way into the most unlikely of places, so if you ride a lot, you’ll inevitably need to service your hubs at some point.
Removing and replacing hub bearings requires a few specialty tools, as well as a good amount of know-how. If you don’t possess either of these, I’d recommend taking your bike to a professional mechanic. However, if you prefer to tinker with things on your own and have a free afternoon, you can follow along with this video and do it yourself. Good luck!
6. Back Wheel of Bike is Locked
Again, we’re assuming here that your rear brake is in working order and not causing any pad rub. If that’s not the case, your bike’s frame or rear fender could be the issue.
Just like the fork, a bike’s rear triangle is only designed to accommodate tires up to a maximum width. Any wider, and the tire will rub against the frame causing drag. And while rear fenders are less common on bikes, they also only work with tires up to a certain width. The solution once again will be selecting a narrower tire.
If this doesn’t seem to be the issue, all that drag is likely being caused by a dirty hub. Removing and accessing the rear hub is a bit more complicated than the front given that the rear wheel also holds the cassette and derailleur, so you’ll have to remove all of this as well. It will require a couple more specialty tools, so the above guidance applies here too…
Seek professional assistance, or accept the risk of taking your bike apart on your own!
Pedal Power Restored
Unless your bike has a motor on it, pedaling is pretty essential if you want to go anywhere. Hopefully these six tips help you fix your bike and get it moving in the right direction.
Which is forward.