Ever tried to do the tango, only to find you’re stepping on each other’s toes? Installing Peloton cleats can feel just like that at first—awkward. But what if it could be as smooth as a waltz instead? Picture yourself gliding into the perfect ride; that’s the promise of nailing this setup.
Remember when you got those brand-new peloton cycling shoes and they fit like a glove (just on your feet)? That joy is just around the corner again. We’ll turn potential frustration into a victory dance by guiding you through choosing compatible cleats, prepping your gear, and getting them installed just right.
Stick with me —you’ll learn how minor tweaks in positioning can supercharge your performance and discover maintenance tips that keep things running smoother than ever before. Ready for some insider knowledge that will have you pedaling with precision? Let’s clip in!
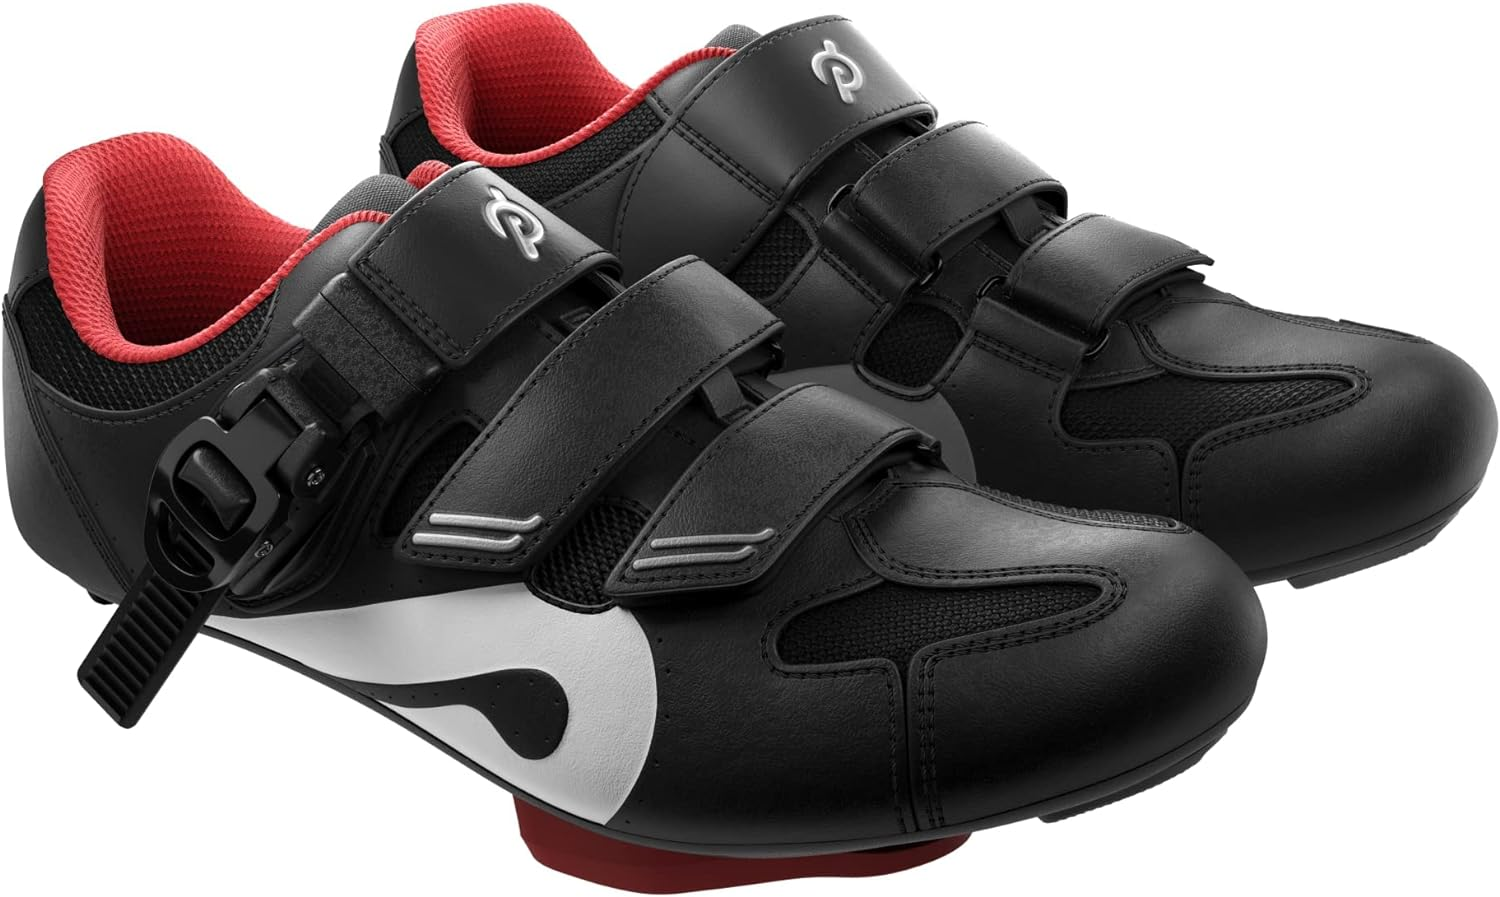
Table Of Contents:
- Understanding Peloton Cleats and Their Compatibility
- Preparing to Install Your Peloton Cleats
- Step-by-Step Guide to Installing Peloton Cleats
- Troubleshooting Common Installation Issues
- After Installation: Testing Your Cleats on the Peloton Bike
- Optimizing Your Ride: Adjusting Cleat Position for Performance
- Maintenance Tips for Your Peloton Cleats
- The Environmental Aspect of Cycling Shoes and Cleats
- How to Install Peloton Cleats FAQs
- Conclusion
Understanding Peloton Cleats and Their Compatibility
If you’re aiming to maximize your Peloton rides, selecting the correct cleat system is just as important as locating the ideal cycling shorts. Let’s break down what makes a cleat compatible with your Peloton exercise bike.
The Lowdown on Look Delta Systems
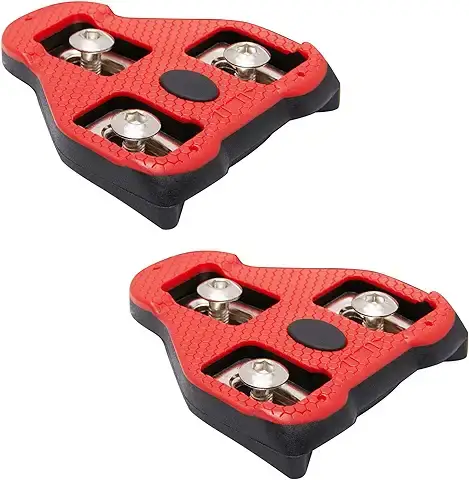
Peloton bikes are engineered for compatibility with Look Delta cleat systems. This three-bolt design offers a stable platform that translates every ounce of your effort into motion. For those new to this gear, Peloton’s official accessories page provides insights into their recommended options.
But why go for Look Delta? The wider contact area reduces pressure points on your feet, letting you push harder without discomfort—a game-changer during those hill climbs when you need it most.
Mixing and Matching: SPD-SLs in the Mix?
You might wonder if other popular road bike cleats like Shimano’s SPD-SL can join the party. While they share a similar three-bolt pattern, subtle differences mean they aren’t quite interchangeable without adapters—an important consideration before making any purchases.
In-depth comparisons between different pedal systems, show how these minute variances impact performance and feel underfoot—something worth mulling over while gearing up.
Finding Your Fit: It’s All About Adjustment
Your journey doesn’t end at choosing the right type; fine-tuning their position is where personal preference takes center stage. Each rider’s anatomy demands unique adjustments for optimal power transfer and comfort—and trust me, getting this dialed-in makes all difference.
Dive deep into positioning nuances through resources like BikeRadar’s guide on setting up shoe cleats. With some trial and error plus patience, nailing that sweet spot will transform your ride experience from good to great.
Maximize your Peloton rides by pairing with Look Delta cleats for a stable, comfy pedal push. But remember, while SPD-SLs may look similar, they need adapters to fit—so choose wisely. Dial in the perfect cleat position for power and comfort; it’ll take your ride from good to great.
Preparing to Install Your Peloton Cleats
Before you jump on your Peloton and start pedaling away, it’s crucial to get those cleats installed right. Think of this as laying the foundation for a house; without proper setup, things can go sideways fast. We’ll walk through what you need and how to prep before turning those screws.
Gathering Your Tools
You wouldn’t paint a masterpiece without brushes, so don’t skimp on tools here. First off, grab your cycling shoes and the cleat kit that came with them or was purchased separately—this should include the cleats themselves plus all necessary hardware. You’ll also want a reliable Allen wrench set handy since most cleat bolts play nice with these tools. A quick tip: some folks swear by using blue Loctite on their threads to prevent loosening over time – something worth considering if you’re aiming for long-term stability.
Setting Up Your Workspace
Your workspace is like your pit stop; it needs to be efficient and organized. Clear off a table or workbench in an area well-lit enough so you won’t miss any small parts playing hide-and-seek. Lay out everything within arm’s reach—the last thing you want is hunting down that rogue bolt when patience wears thin.
Laying Out The Components
Splay out all components from the box onto your workspace—it helps avoid surprises mid-installation when suddenly there’s an extra piece staring back at you questioningly. Peloton recommends checking compatibility first, just because they fit doesn’t mean they’re meant for each other. Once assured they match up like coffee with mornings, position them atop your shoes eyeballing where underfoot feels natural—you’ll fine-tune this later but aim for general ballpark now.
Remember: haste makes waste especially in precision tasks such as setting up bike gear properly.
Before hopping on your Peloton, installing cleats is like laying a house foundation—it’s got to be done right. Make sure you’ve got your cycling shoes, cleat kit, and Allen wrench set ready. Consider using blue Loctite for bolt stability. Set up a tidy workspace with good lighting and lay out all components to avoid any mid-installation surprises.
Step-by-Step Guide to Installing Peloton Cleats
Finding the Right Position for Your Cleats
Before you start, it’s key to find where your cleat should sit on your shoe. Think of this like placing the foundation for a house – get it right and everything else falls into place. You’ll want the center of the pedal axle to align with the ball of your foot. This sweet spot ensures maximum power transfer without straining your joints.
To pinpoint this area, put on your cycling shoes and feel for that bony bit on the side of your big toe (the first metatarsal). Marking this point directly onto each shoe gives you a visual cue when positioning those cleats.
Attaching Cleats to Shoes
With markers in hand, lay out all pieces from your Peloton cleat set. These typically include cleats, bolts, and washers or spacers if provided. Align each cleat over its mark then use an Allen wrench – usually a 4mm size works – but check what fits best before turning any screws.
Bolt them down loosely at first; snug enough so they don’t move freely but still allow some wiggle room for adjustments later on.
Making Fine Adjustments Before Final Tightening
This part is about fine-tuning. Make sure there’s no angle that might cause knee pain during rides – we’re aiming for as straight as possible here. The goal is to have clear access into and out of those pedals while maintaining comfort throughout sessions long or short.
You’ll be tightening each bolt in stages now; think ‘slowly but surely’. Go corner by corner in a cross pattern which helps distribute pressure evenly across the entire cleat surface – much like securing car tires.
Remember: every turn counts because once these are fully tightened up, minor changes become more challenging.
And just like that—you’re ready. Give yourself some credit; installing Peloton bike clips can seem daunting initially yet following these steps carefully leads toward success with fewer do-overs than expected.
Now go ahead—clip in confidently knowing every pedal stroke stands upon solid groundwork laid by none other than you.
Get your Peloton cleats spot on by aligning them with the ball of your foot for a strong, comfy ride. Lay out all parts, bolt down loosely, adjust to avoid knee pain and tighten gradually in a cross pattern—like securing car tires—to ensure an even fit.
Troubleshooting Common Installation Issues
When you’re setting up your Peloton cleats, a smooth start can hit bumps along the way. Let’s tackle those head-on. First off, if your cleats don’t seem to align right on your shoes, take a breath and double-check.
Cleat Alignment Difficulties
Alignment issues often come down to two things: placement or shoe compatibility. For perfect placement, imagine a straight line from the tip of your big toe to the center of the pedal axle when clipped in. This is where you want your cleat positioned as a starting point. If it’s still not lining up well with this method, check out Peloton’s guidelines for more help.
Sometimes though, it’s about the shoes themselves; they need to play nice with Peloton’s three-bolt system. Not all cycling shoes are created equal. Ensure yours are compatible before going any further—this could save you heaps of time and frustration.
Hardware Malfunctions
If hardware is giving you grief—it happens even to seasoned cyclists—the fix might be simpler than it seems at first glance. Start by examining each piece closely; sometimes screws aren’t catching because they’re worn or damaged straight out of the box—a quick trip back to where you got them should set that right.
In cases where everything looks good but still won’t tighten properly? It may just be cross-threading trickery playing games with you. Take another crack at it slowly and steadily—align carefully before tightening again.
Finding That Sweet Spot Post-Installation
All set? Before celebrating too soon after installation success comes an essential step: finding that sweet spot for comfort during rides requires fine-tuning over multiple sessions sometimes—but once dialed in correctly will feel like second nature every time thereafter.
To get there involves adjusting forward/aft position plus side-to-side angle based on how natural pedaling feels underfoot while ensuring no undue stress lands on knees or ankles especially since these joints bear much brunt during intense workouts typically seen with indoor cycling routines such as those offered via Peloton classes online.
Hit a snag installing your Peloton cleats? Remember, it’s often about correct placement or shoe compatibility. Double-check they match Peloton’s three-bolt system and line up from toe to pedal axle. For hardware hiccups, inspect screws for damage and avoid cross-threading by tightening slowly.
After installation, fine-tune the position for maximum comfort during rides—this might take a few tries but will pay off in smooth pedaling without stressing your joints.
After Installation: Testing Your Cleats on the Peloton Bike
Snapping into your pedals with a satisfying click, you feel the secure connection between your cycling shoes and the Peloton bike. But that perfect clip-in didn’t happen by chance—it’s all about making sure those cleats are installed just right. Let’s walk through how to test them properly.
Clipping In: The First Test
To start, place your shoe flat against the pedal. Press down until you hear a click—the sound of success. It means your cleat has engaged with the pedal mechanism firmly. If it doesn’t clip in easily, double-check if there’s any debris or misalignment causing trouble.
Gently twist your heel away from the bike—if everything is aligned well, you should detach smoothly without much force. This ‘twist-out’ move is crucial for safe dismounts during rides or quick stops.
Finding Your Footing: Adjusting Tension
Peloton bikes let you adjust pedal tension—a tighter setting gives more resistance when clipping in and out while looser makes it easier but less secure. Start at medium tension; then tweak as needed based on comfort and security preferences as this can impact both performance and safety significantly.
If adjusting doesn’t solve clipping issues, consider revisiting installation steps to ensure accuracy because sometimes even minor errors can affect functionality profoundly.
The Wiggle Room Check
A little lateral movement—or float—in your feet while clipped in is normal and necessary for knee health but too much indicates a problem with cleat placement or tightness of bolts securing them onto shoes which need immediate attention before hitting full stride on workouts again.
Remember, these tests aren’t just one-time tasks—they’re part of ongoing maintenance routines designed to keep every ride smooth and safeguard against wear over time. So give those newly installed cleats a thorough checkup after each install—your knees will thank you later.
Get a perfect clip-in on your Peloton by pressing down until it clicks, adjusting the pedal tension to your liking, and making sure there’s just a bit of float. If you run into trouble, double-check installation or bolt tightness—it’ll save your knees and keep rides smooth.
Optimizing Your Ride: Adjusting Cleat Position for Performance
Getting your cleat position just right can feel like finding the sweet spot in a comfy chair. It’s all about making sure you’re positioned to pedal with power and comfort, reducing strain on your joints during intense workouts.
Finding Your Unique Cleat Placement
The key to performance is personalization. Begin with the cleats beneath your foot’s ball—a usual starting point—but don’t forget it isn’t a “one-size-fits-all” situation. Think of it as setting up a new phone; you need to tweak settings until everything feels intuitive and efficient.
To dial in that perfect fit, consider factors like fore-aft adjustment—moving cleats forward or back—and rotational alignment which allows natural toe-in or toe-out positioning. For those who crave precision, tools such as goniometers are game-changers but don’t overlook the value of how adjustments feel while riding.
Tweaking for Comfort and Power Transfer
Achieving harmony between comfort and power transfer might sound like trying to balance on a tightrope, but small shifts can bring big rewards. If you often find yourself pushing through long climbs or sprints, moving cleats slightly backward may help distribute pressure more evenly across your feet.
This change can be akin to shifting gears when climbing a hill—it doesn’t make the hill any smaller but makes pedaling up it more manageable. When experimenting with lateral adjustments (side-to-side), imagine aligning tires on pavement; there’s an optimal track where grip meets efficiency without unnecessary wear on your tires—or in this case, knees.
Leveraging Micro-Adjustments Over Time
Much like fine-tuning an instrument before a concert begins, even minor tweaks over time keep you performing at peak levels throughout every ride. Remember though, changes should come gradually, allowing an adaptation period between each adjustment so muscle memory doesn’t miss a beat. Always listen to your body’s feedback; if something feels off, return to the previous setting and reassess from there.
- If clipping out becomes harder, think about rotating towards a wider stance.
- Noticeable hot spots could mean too much pressure in a certain area, requiring a slight shift to relieve tension.
Maintenance Tips for Your Peloton Cleats
Keeping your Peloton cleats in top shape is crucial to ensure a smooth ride every time. But, it’s not just about performance; well-maintained cleats can also prevent injuries caused by unexpected disengagement during intense sessions. Let’s break down the best practices for maintaining your cycling sidekicks.
Cleaning Rituals: The Foundation of Cleat Care
Dirt and grime aren’t just unsightly—they’re the archenemies of any cleat system. A regular cleaning routine after each ride will keep these intruders at bay. Start with a soft brush or cloth to remove loose dirt from the surface of the cleats. For stubborn residue, mild soap and water do wonders but steer clear of harsh chemicals that could degrade plastic components.
Once clean, drying them thoroughly before storage is key because moisture can lead to corrosion over time—a sneaky culprit that weakens metal parts silently.
Inspection Intervals: Catching Wear Before It Catches You
Your eyes are powerful tools when it comes to maintenance—regular inspections can save you from mishaps later on. Look out for visible signs of wear like scrapes or deformations on your cleats, especially around the engagement points where they clip into pedals. Peloton’s guidelines can provide further information.
If you notice uneven wear patterns, consider whether adjustments might be needed in your riding form or pedal tension settings, which could extend their lifespan significantly.
The Replacement Rule: Knowing When To Say Goodbye
Despite our best efforts, some things don’t last forever, including bike equipment. When is it time to bid farewell to our beloved bike equipment? If inspection reveals severe damage such as cracks or significant thinning areas, then replacement becomes necessary. Also, listen closely—clipping sounds that change dramatically may indicate the need for a fresh set. “Make sure” to check manufacturer recommendations; most suggest changing every 6-12 months depending on usage.
Sustainable Cycling Practices:
But what happens to retired gear, you might ask? Well, sustainability doesn’t stop when the wheel turns. Consider recycling options or donating gently used items to local programs that support eco-friendly habits among cyclists. Moreover, opting for materials from brands committed to environmental responsibility contributes to a larger movement towards a greener planet.
Keep your Peloton cleats clean and inspect them regularly to avoid performance issues and injuries. If they show serious wear or damage, replace them as recommended—usually every 6-12 months—and stay eco-friendly by recycling the old ones.
The Environmental Aspect of Cycling Shoes and Cleats
As cyclists, we’re often focused on the road ahead, but it’s crucial to consider the environmental footprint left behind by our gear. Specifically, cycling shoes and cleats play a subtle yet significant role in sustainable practices within the sport.

Recycling Old Components
Sometimes your trusty gear reaches its ride’s end. But before you toss those worn-out shoes and cleats, think green. Many manufacturers now take back old products for recycling or upcycling. Companies like Adidas, with their commitment to sustainability, offer programs that give new life to used athletic wear.
This circular approach helps reduce waste considerably because materials like rubber and plastic can be remade into new products instead of ending up in landfills. If you’re unsure where to start, local bike shops often serve as collection points for recycling initiatives or can point you toward regional options.
Selecting Eco-Friendly Options
The choice is also powerful when purchasing new cycling footwear. Brands are increasingly mindful of their ecological impact; some use recycled materials or adopt manufacturing processes that lower carbon emissions significantly.
VivoBarefoot, for example, uses eco-friendly materials across its product lines while maintaining high performance standards—a win-win for both riders and planet Earth alike.
Maintenance: A Sustainable Practice
Maintaining your cycling shoes isn’t just about longevity—it’s an environmentally conscious act too. Regularly cleaning cleats ensures they work efficiently longer so you won’t need replacements as soon—meaning less material turnover over time.
When maintenance seems daunting remember: a stitch in time saves nine—and keeps more out of the recycle bin. By keeping equipment in top shape through simple actions like wiping down after rides or checking bolt tightness periodically we not only extend our gear’s lifespan but also contribute positively towards reducing overall consumption patterns linked with sports accessories production cycles globally speaking.
Don’t just ride, recycle. Before ditching your old cycling shoes and cleats, check out brands like Adidas for recycling programs. Go green with eco-friendly options from companies like VivoBarefoot when buying new gear. Keep those pedals spinning longer by maintaining your equipment—it’s good for both the bike and our planet.
How to Install Peloton Cleats FAQs
How do you attach cleats to a Peloton Bike?
Align the cleat with your shoe’s sole, match it to the pedal interface, and tighten securely using an Allen wrench.
How do you position Peloton cleats?
Position them under the ball of your foot for optimal power transfer. Make sure they’re straight and centered before tightening.
How do you set up Peloton foot clips?
Snap in the toe first then press down on your heel until it clicks into place; make adjustments as needed for comfort.
What is the correct position for SPD cleats?
The SPD cleat should sit under the ball of your foot, allowing natural motion during pedaling without strain or discomfort.
Conclusion
So you’ve learned how to install Peloton cleats, ensuring your rides are as smooth as silk. So you’re prepped with the right tools and know-how for perfect placement. So adjustments and maintenance aren’t mysteries anymore but part of your routine.
Remember these key points: Proper alignment is crucial, testing is non-negotiable, and tweaks can transform your performance. Remember that regular check-ups prevent mishaps down the road. Remember that sustainability matters even in cycling gear choices.
Cleat up confidently now; you’re equipped to dance on those pedals like a pro. Go ahead—make every ride count!